

How To Add Angular 2 App To Plesk
Advertisements
The Node.js application is finally finished! Now it's time to host the application – i.e. to deploy (publish) it. Plesk is perfect for this. I will show you step by step how to install Node.js in Plesk and publish your application. Advertisements
Advertisement
Node.js is becoming more and more popular and therefore of course the question of hosting the applications. This is where Plesk comes in.
The web hosting software can be installed on Linux as well as on Windows servers and offers various possibilities to manage websites and web applications – even Node.js applications! Advertisements
Table of Contents −
- 1. Upload code to the target directory
- 2. Add Node.js extension to Plesk
- 3. Activate Node.js for your domain or subdomain
- 4. Install Dependencies
- 5. Restart and test the app
- 6. Configure Apache & nginx
1. Upload code to the target directory
Your complete code of the Node.js application must first be uploaded to the server. You should already have created a domain or subdomain in Plesk.
Advertisement
You can easily upload everything via (S)FTP or git repository to the httpdocs directory on the server. Advertisements
Important: The node_modules folder does not need to be uploaded.
2. Add Node.js extension to Plesk
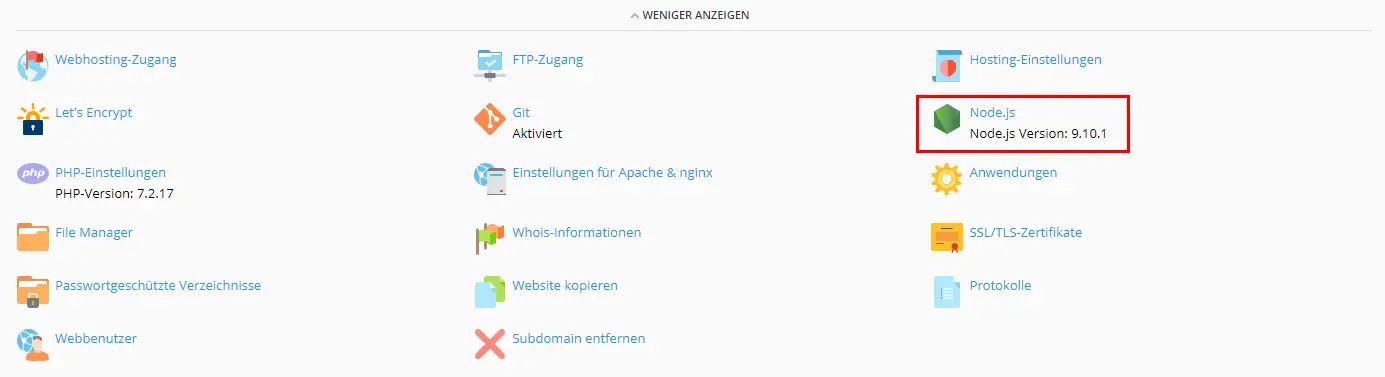
On your Plesk interface, you can install the Node.js extension under "Extensions". You do not need to configure anything else for Node.js for the time being.

Attention: Do not execute Node.js independently using the npm command in the console. This can destroy your Plesk installation. Advertisements
3. Activate Node.js for your domain or subdomain
Only one Node.js application can run per domain or subdomain. To start it, navigate to your corresponding domain and then to "Node.js".
Advertisement
There you will find this view where we have to make some settings (looks slightly different in newer versions – function is the same):
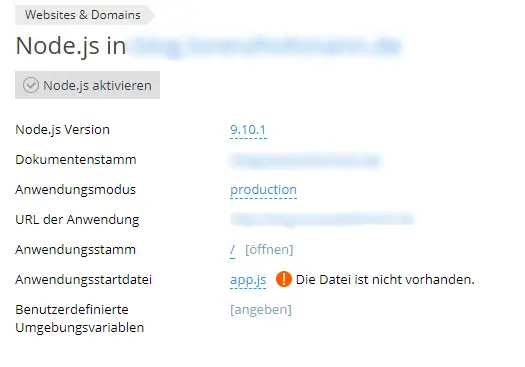
The individual settings have the following meaning:
- Node.js Version: Here we can usually select the latest version.
- Document Root: This is the path where your application is/will be.
- Application Mode: Here you can choose between "development" and "production". Since we want to publish our app, we set the value to "production".
- Application URL: We can't change anything here, Plesk only shows us the address where our application can be reached.
- Application Root: Here you must select the directory where our app has the root directory.
- Application Startup File: This is the most important file. The starting point for our program, that is the main JS file. Usually your app.js or index.js. If it is located in a subdirectory, you have to enter the following value: ./server/index.js.
- Custom environment variables: Here you have the possibility to create environment variables for the app. These are variables that your program can read via
process.env.VARIABLE. This is often used for authentication keys (JWT & Co.), express settings or database access data.
By the way: In Plesk you can easily host your own cloud for free with Nextcloud.
4. Install Dependencies
Now we click on "Enable Node.js" and then on "npm-Installation" to install all dependencies from our package.json. Here our node_modules folder is automatically created in the root directory of the app.
5. Restart and test the app
Now our application is ready. For the application to run correctly, we should press "Restart App" again. Then we can test our app by clicking on the corresponding link.
Advertisement
6. Configure Apache & nginx
The default port for Node.js applications is 3000. Advertisements
On my server I have encountered the problem that my Apache has crashed permanently. This happened within the first few minutes after starting the Node.js application.
I could fix this by deactivating the "proxy mode". You can find this setting under "Settings for Apache & nginx" of the corresponding domain.

After disabling this feature, the Apache web server ran without problems.
And you have already successfully installed Node.js and published your application! 🙂
Advertisements 
How To Add Angular 2 App To Plesk
Source: https://webdeasy.de/en/deploy-node-js-app-with-plesk/
Posted by: bruntonthersellse1961.blogspot.com
0 Response to "How To Add Angular 2 App To Plesk"
Post a Comment